
Cozy Mittens
by Martha Stewart Design Team
These cozy mittens are not only knit flat, but also sideways! The sideways mittens are a fun twist on a classic knitting project.
Disclaimer: This post may contain affiliate links. If you click one, we may receive a small commission at no cost to you. Thank you.
If you’ve ever browsed Pinterest for mitten patterns, you’ve surely seen these sideways mittens. I always knew I would try this pattern one day. The abstract shape is interesting and the seaming looks ultra satisfying. But it took me months (maybe even a year) to find the motivation.
Why did it take so long for me to finally cast on? Because in my opinion, sideways knits are a pain in the neck. I like to try on my knits as they progress, which is easy when knitting top-down or bottom-up. But with this mitten pattern, you can’t try on the mittens until they are fully completed and seamed.
What if they don’t fit? What if I make a mistake while knitting? I don’t want to knit an entire mitten just to frog it later (spoiler alert, this happened). Regardless of these fears, I finally pulled together the motivation to try these sideways knit mittens.
Now, a few different knitters have posted this pattern on their websites, and I want to give credit to each page and pattern I used. ItalianDishKnits and Gina-Michele.com were the main ones I saw on Pinterest, and I read their patterns to get a better understanding of how the proportions and construction worked.
However, after digging a little deeper, I believe the original pattern came from Martha Stewart herself. I found the pattern was published in 2013 on both Ravelry and the Martha Stewart website. It has since been delisted from the Martha Stewart website but the PDF versions are still available on Ravelry.
My Attempt and Alterations:
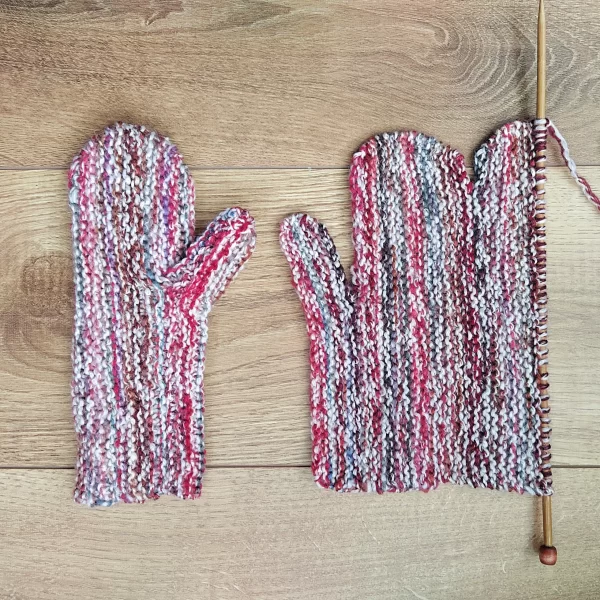
To be completely honest: I ended up knitting three mittens.
It’s not that the first mitten was bad… It just didn’t quite fit my hand. I knew I had to try again and make some adjustments. Here’s the changes I made compared to the original pattern (women’s size):
- I added a couple rows to the mitten width because the garter stitch ridges were stretching too much. I wanted to maintain the tight ridges, not stretch them out.
- I lengthened the overall project so it extends a little further down the wrist.
- Compared to some of the patterns listed above, I lengthened the thumb (my thumbs are relatively long and skinny)
Below you’ll find the exact pattern I used to knit the mittens in the photo.
What I used:
- 2 skeins Katia Concept Alma in Rose Vert.
- Note: at the time of writing this yarn is no longer available on the Katia website, but some resellers still have it in stock.
- 5mm straight knitting needles
- Darning needle for seaming / weaving in ends
Abbreviations:
- CO: Cast on (we used the classic long-tail cast on)
- k: knit
- m1: make 1 stitch
- k2tog: knit 2 stitches together
Gauge:
- 19 stitches = 10cm in Garter Stitch on 5mm needles.
Sizes:
- I used the “Women’s” size pattern as a starting point.
- Kids and Men’s size mitten patterns are available on Ravelry.
What I used:
- 2 skeins Katia Concept Alma in Rose Vert.
- Note: at the time of writing this yarn is no longer available on the Katia website, but some resellers still have it in stock.
- US Size 8 straight knitting needles
- Darning needle for seaming / weaving in ends
Abbreviations:
- CO: Cast on (we used the classic long-tail cast on)
- k: knit
- m1: make 1 stitch
- k2tog: knit 2 stitches together
Gauge:
- 19 stitches = 4 inches in Garter Stitch on US Size 8 needles.
Sizes:
- I used the “Women’s” size pattern as a starting point.
- Kids and Men’s size mitten patterns are available on Ravelry.
Instructions for knitting sideways mittens
Cast on 35 Stitches
Row 1: knit
Row 2: k1, m1, knit to end (36 stitches)
Row 3: knit
Row 4: knit
Row 5: knit
Row 6: k1, k2tog, knit to end (35 stitches)
Row 7: knit
Row 8: k1, k2tog, knit to end (34 stitches)
Row 9: knit
Row 10: Bind off the first 11 stitches, then knit to the end of the row (23 stitches)
Row 11: knit all stitches, then cast on 17 more stitches at the end of the row (40 stitches)
Row 12: knit
Row 13: knit to last stitch, m1, k1 (41 stitches)
Row 14: knit
Row 15: knit to last stitch, m1, k1 (42 stitches)
Row 16: knit
Row 17: knit to last stitch, m1, k1 (43 stitches)
Rows 18-30: knit
Row 31: knit to last 3 stitches, k2tog, k1 (42 stitches)
Row 32: knit
Row 33: knit to last 3 stitches, k2tog, k1 (41 stitches)
Row 34: knit
Row 35: knit to last 3 stitches, k2tog, k1 (40 stitches)
Row 36: knit
Row 37: knit
Row 38: Bind off the first 5 stitches, then knit to the end of the row (35 stitches)
Row 39: knit all stitches, then cast on 5 more stitches at the end of the row (40 stitches)
Row 40: knit
Row 41: knit
Row 42: k1, m1, knit to end (41 stitches)
Row 43: knit
Row 44: k1, m1, knit to end (42 stitches)
Row 45: knit
Row 46: k1, m1, knit to end (43 stitches)
Rows 47-54: knit
Row 55: Bind off the first 24 stitches, then knit to the end of the row (19 stitches)
Row 56: knit all stitches, then cast on 11 more stitches at the end of the row (30 stitches)
Row 57: knit
Row 58: knit
Row 59: k1, m1, knit to end (31 stitches)
Row 60: knit
Row 61: knit to last 3 stitches, k2tog, k1 (30 stitches)
Row 62: knit to last 3 stitches, k2tog, k1 (29 stitches)
Row 63: knit to last 3 stitches, k2tog, k1 (28 stitches)
Row 64: knit to last 3 stitches, k2tog, k1 (27 stitches)
Row 65: knit to last 3 stitches, k2tog, k1 (26 stitches)
Bind off all stitches
Finishing
For instructions on seaming, ItalianDishKnits has a wonderful image tutorial. I love that they used a contrasting yarn for the seams, and it makes the visual instructions super easy to follow.
Once finished seaming, weave in any loose ends and block to finish.
Want FREE knitting patterns?
Subscribers get FREE access to newly-released patterns.
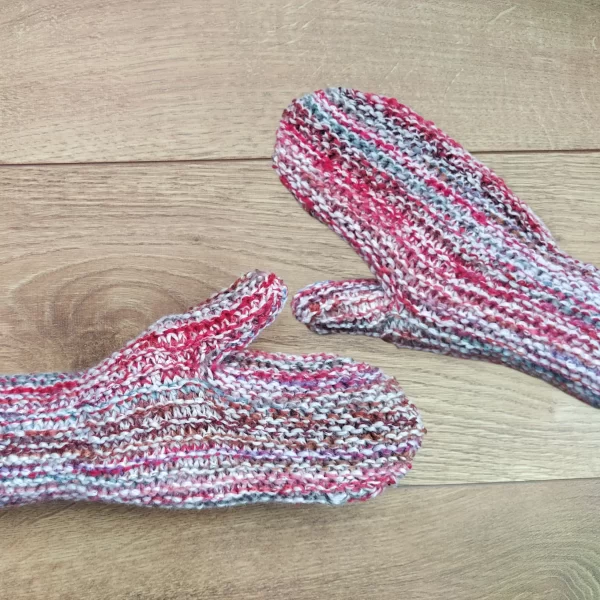
Help – Are the left and right mittens knitted with the exact same pattern? Seems like it would have to be reversed.
This pattern doesn’t have any special thumb shaping, so the left and right mittens are identical when flat. The only difference is how it is seamed up!
You can knit the above pattern twice, then fold the mittens in opposite directions when seaming.
Has anyone made these? The flat layout makes no sense to me. Why don’t the sides match? Why is one thumb upside down?
Hi Darlene, I agree this pattern looks a little crazy, but somehow it works!
ItalianDishKnits has a great step-by-step tutorial here for seaming these mittens, which might help you visualize how/why the thumb is upside down.
Is there still a kid size pattern?
Unfortunately the kid size pattern was also delisted. I’ve ordered some yarn and I plan to build out the additional sizes as soon as it arrives.Update: the wonderful team at Ravelry managed to pull the PDF patterns from the archives. All three sizes can be found on the pattern page!
Thank you!
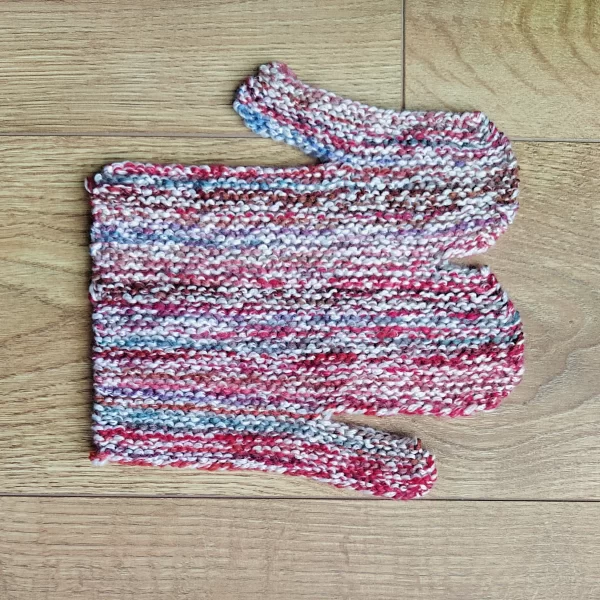
Why are there less rows in the second side of the mitten than the first? 5 rows difference feels like a lot.
Hi Katy,
One of the pictures shows a flatlay of a mitten (before seaming). That might help you understand the finished shape.
In short, the construction of these mittens is unusual, and the row counts are indeed unbalanced. It’s all part of the unique design.
But if you have any doubts, feel free to check out the original Martha Stewart pattern.Unfortunately, it has been brought to my attention that the original Martha Stewart pattern has been delisted.This page was originally meant to be a pattern trial/review, but I’m working on building out the sizing and instructions to create a complete pattern. It will take a little time though, as I need to knit and write up the different sizes.
Hi Leneta,
When you click on the link above it goes to fingerless gloves!?? Where is the original pattern?
Hi Rita, thanks for flagging!
It appears the Martha Stewart pattern has been delisted… I tried viewing it through the Ravelry page, and the links are all incorrect / broken.
This is really unfortunate, it’s such an interesting pattern! I will try to build out the instructions and sizes on this page, but it will take some time to knit / write everything up.
Thanks! When I first saved this pattern it was there correctly.
What is a yarn to use?
Hi Sophie,
I used the Concept Alma yarn from Katia yarns (here’s the Ravelry link), but I don’t think it’s available everywhere.
You can easily substitute with another chunky yarn, as long as the gauge is 19 stitches = 10cm in Garter Stitch.
I recommend choosing a yarn that’s soft and somewhat fluffy, to insulate from the cold.