
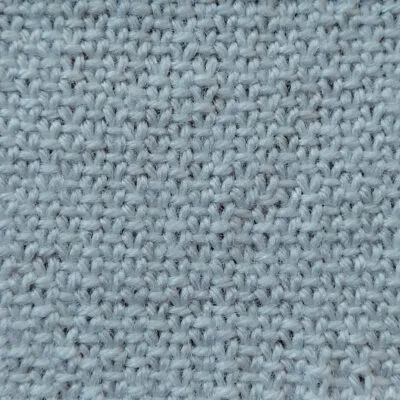
Linen Stitch
This simple yet elegant knitting stitch mimics the tight weave of linen fabric by alternating knits and slipped stitches.
Because this stitch knits tight, it’s recommended to choose needles 2 sizes larger than recommended for your yarn.
Disclaimer: This post may contain affiliate links. If you click one, we may receive a small commission at no cost to you. Thank you.

I, along with many other knitters, have a love-hate relationship with Linen Stitch.
On one hand, it’s absolutely gorgeous. I can’t help but stop scrolling whenever I see a good Linen swatch on my Pinterest or Instagram feeds. On the other hand, it’s not very practical for real-life knitting. Check out the pros and cons below.
Pros of Linen Stitch:
- It lays perfectly flat
- The wrong side is also beautifully textured
- It’s stretchy horizontally
- It softens color transitions on striped yarn
Cons of Linen Stitch:
- This stitch knits tight. Use needles 1-2 sizes larger than recommended.
- Knits up very slowly due to all the slipped stitches
- The bind off edge can get a bit loose. Switch to smaller needles for the final Bind Off row
What you’ll need:
- Yarn of your choice
- Knitting needles 2 sizes larger than recommended
Abbreviations:
- k: knit
- p: purl
- sl1wyif: slip 1 stitch (purlwise) with yarn in front
- sl1wyib: slip 1 stitch (purlwise) with yarn in back
Instructions for knitting Linen Stitch:
Knitting Flat:
Cast on an even number of stitches
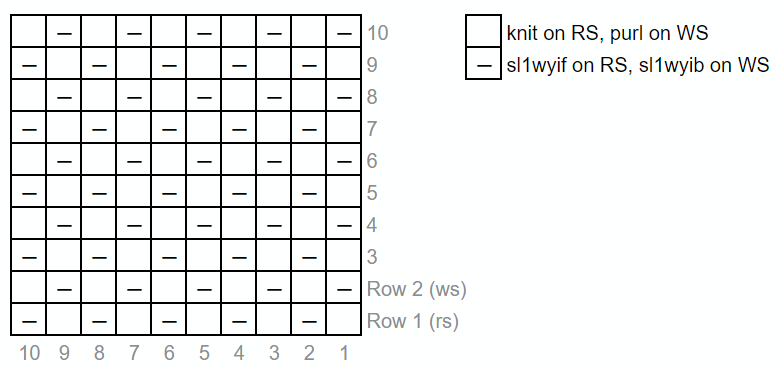
Row 1 (rs): *k1, sl1wyif, repeat from * to end of row
Row 2 (ws): *p1, sl1wyib, repeat from * to end of row
Repeat rows 1-2 until desired length is reached.
In the Round:
Cast on an odd number of stitches and join into a round, taking care not to twist.
Round 1: *k1, sl1wyif, repeat from * to last stitch, k1
Round 2: *sl1wyif, k1, repeat from * to last stitch, sl1wyif
Repeat rounds 1-2 until desired length is reached.
Chart:
Want FREE knitting patterns?
Subscribers get FREE access to newly-released patterns.
Dear Leneta, thank you so much for this instruction. I am not a beginner, I have followed patterns that aren’t too simple but am learning new things with each project. The link on Youtube is the only one on this theme. It makes an increase within the fabric, before the edge, but I’d like them to increase at the edge to make some shaping.
Thanks again for answering, and Happy Holidays, coming up soon :).
Best Wishes
Janet
Hello, I love the linen stitch and would like to make a whole sweater with it. But I can’t find anywhere how to increase or decrease the linen stitch. Can you give me a tip?
Thank you
JANET PERRY
Hi Janet, that’s an interesting idea. I’m not sure what your skill level is, so I’ll give some general advice that can be helpful for anyone.
First, I recommend making a seamed sweater where you knit each piece individually, as opposed to a yoke or raglan sweater. That way the increases/decreases will be somewhat hidden along the seams. However if you’re wanting to increase in the middle of a linen stitch project, I found this video on Youtube to be quite helpful.
When knitting seamed projects, it’s common to add a single knit stitch at the beginning and end of each row. These stitches will be used for seaming, so they won’t be visible in the final project. These stitches can also be used as anchors for increasing/decreasing stitches. So a hypothetical increase row would look like this:
RS row: k1, m1, work even in linen stitch until 1 stitch remains, m1, k1 (2 stitches increased)
WS row: p1, work even in linen stitch until 1 stitch remains, p1 (new stitches have been absorbed into the linen stitch pattern)
To do this without a written pattern, you’ll need to be comfortable knitting linen stitch by sight. (I.e. you should know whether to slip or knit/purl a stitch by looking at the stitches around it).