
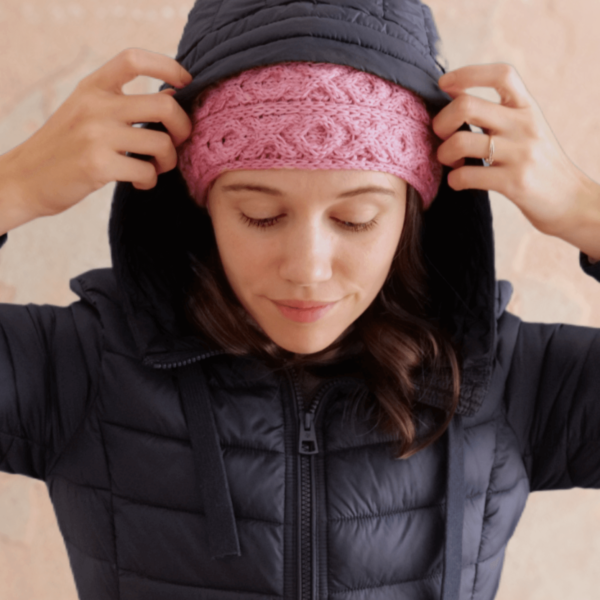

Valentine Headband
The Valentine headband is surprisingly easy to knit, made of just basic cables and slipped stitches. It’s warm enough for even the chilliest February days.
Disclaimer: This post may contain affiliate links. If you click one, we may receive a small commission at no cost to you. Thank you.
When I first learned to knit cables, I completed skipped the classic 2×2 twists. Instead, I jumped straight into XO cables.
Why? Because they called to me. I was so intrigued by the idea that a couple twisted stitches could make such a defined, recognizable pattern. Pair that with pink yarn and I was absolutely sold. Now, after years of practice, I can knit XO cables all day, all night, blindfolded, maybe even in my sleep.
When designing the Valentine Headband, I wanted to keep the focus on the cables and avoid any textured edge stitches. This meant the common garter and seed stitches edges were a no-go. Instead I used slipped stitches to create an i-cord edge which pairs marvellously with the thickness of the cables.
What you’ll need:
- 1 skein of fingering weight yarn. I used “Valentine” from Piratenwolle on Etsy. You’ll be holding two strands of fingering yarn together, or you can substitute a single strand of worsted weight yarn.
- 5.0mm knitting needles
- Cable needle
- Darning needle for seaming / weaving in ends
Abbreviations:
- CO: Cast on (we used the classic long-tail cast on)
- k: knit
- p: purl
- sl#wyif: slip # stitches purlwise with yarn held in front of your work.
- sl#wyib: slip # stitches purlwise with yarn held behind your work.
- c2b: slip the next 2 stitches onto a cable needle and hold behind your work. Knit the following 2 stitches, then knit the 2 stitches from the cable needle (taking care not to twist).
- c2f: slip the next 2 stitches onto a cable needle and hold in front of your work. Knit the following 2 stitches, then knit the 2 stitches from the cable needle (taking care not to twist).
Gauge:
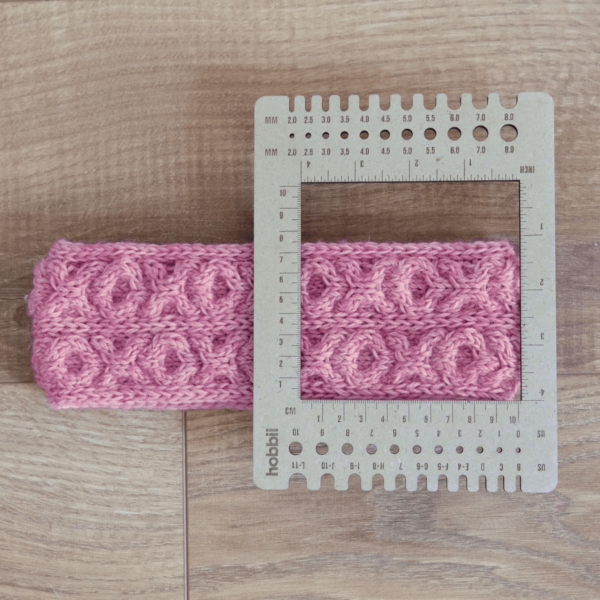
- Because headbands are so thin, swatching isn’t really needed. Just start the pattern and see how your tension looks. The headband should be approximately 7-8cm wide.
Sizes:
The size of the headband is determined by the length. For a custom fit, measure the circumference of your head where the headband will sit and subtract 2.5cm, or follow the standard sizes below:
- Adult small / teen: 48cm headband length (50.5cm head circumference – 2.5cm negative ease)
- Adult medium: 53.25cm headband length (55.75cm head circumference – 2.5cm negative ease)
- Adult large: 55.75cm headband length (58.25cm head circumference – 2.5cm negative ease)
What you’ll need:
- 1 skein of fingering weight yarn. I used “Valentine” from Piratenwolle on Etsy. You’ll be holding two strands of fingering yarn together, or you can substitute a single strand of worsted weight yarn.
- US Size 8 knitting needles
- Cable needle
- Darning needle for seaming / weaving in ends
Abbreviations:
- CO: Cast on (we used the classic long-tail cast on)
- k: knit
- p: purl
- sl#wyif: slip # stitches purlwise with yarn held in front of your work.
- sl#wyib: slip # stitches purlwise with yarn held behind your work.
- c2b: slip the next 2 stitches onto a cable needle and hold behind your work. Knit the following 2 stitches, then knit the 2 stitches from the cable needle (taking care not to twist).
- c2f: slip the next 2 stitches onto a cable needle and hold in front of your work. Knit the following 2 stitches, then knit the 2 stitches from the cable needle (taking care not to twist).
Gauge:
- Because headbands are so thin, swatching isn’t really needed. Just start the pattern and see how your tension looks. The headband should be approximately 3 inches wide.
Size:
The size of the headband is determined by the length. For a custom fit, measure the circumference of your head where the headband will sit and subtract 1 inch. Or follow the standard sizes below:
- Adult small / teen: 19 inch headband length (20 inch head circumference – 1 inch negative ease)
- Adult medium: 21 inch headband length (22 inch head circumference – 1 inch negative ease)
- Adult large: 22 inch headband length (23 inch head circumference – 1 inch negative ease)
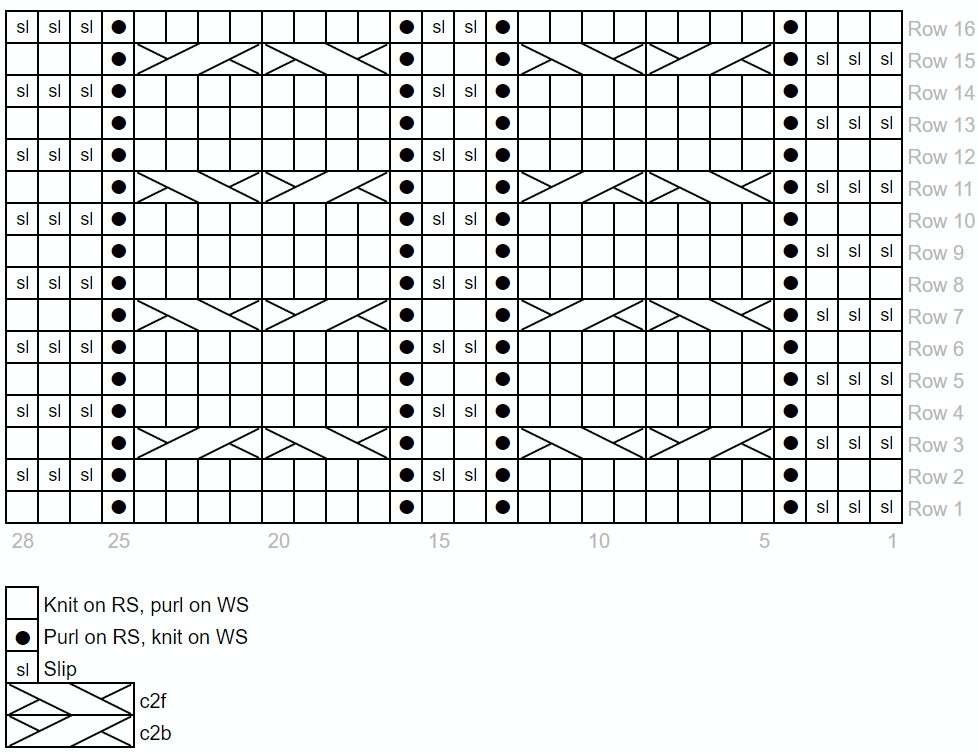
Chart:
Instructions
Holding 2 strands of yarn together, or a single strand of worsted weight, CO 28 stitches. We used the classic long-tail cast on.
Row 1 (rs): sl3wyib, p1, k8, p1, k2, p1, k8, p1, k3
Row 2 and all even rows (ws): sl3wyif, k1, p8, k1, sl2wyif, k1, p8, k1, p3
Row 3: sl3wyib, p1, c2b, c2f, p1, k2, p1, c2f, c2b, p1, k3
Row 5: repeat row 1
Row 7: sl3wyib, p1, c2f, c2b, p1, k2, p1, c2b, c2f, p1, k3
Row 9: repeat row 1
Row 11: repeat row 7
Row 13: repeat row 1
Row 15: repeat row 3
(Row 16: repeat row 2)
Repeat rows 1-16 until headband reaches desired length. For the headband in the images, we completed rows 1-16 a total of 10 times with a final length of approximately 48cm (19 inches).
Bind off all stitches and cut a long tail. Use this tail to sew the two sides of the headband together, or use dpns to knit an icord seam. The latter takes a little more time and effort, but it compliments the slipped-stitch border wonderfully.
Finishing
Block your headband and use a darning needle to weave in loose ends.
Want FREE knitting patterns?
Subscribers get FREE access to newly-released patterns.
2 Comments