


Wavy Whimsy Baby Blanket
A vibrant, playful baby blanket knitting pattern. This pattern uses self-striping yarn and short rows to create distinct pools of color.
Disclaimer: This post may contain affiliate links. If you click one, we may receive a small commission at no cost to you. Thank you.
While browsing the last of the yarn available during the big JoAnn Fabrics shutdown, I managed to snag a couple skeins of Big Twist Menagerie yarn in the hummingbird colorway. This yarn is absolutely gorgeous and I wanted to do it justice, but I knew using it in simple stitches like stockinette or garter would muddle the colors.
So I started looking for stitch patterns that would encourage the colors to pool, effectively separating and concentrating them. That’s when I stumbled across the Lizard Ridge dishcloth pattern by Fogbound Knits. The short rows encourage pooling, while the garter stitch stripes break the waves and provide a visual balance. So I used this pattern as a starting point and made key changes to fit what I had in mind, thus creating the Wavy Whimsy baby blanket.
I should note that Fogbound Knits does have a blanket pattern using the same stitch, which appears to use columns seamed together to create a staggered wave effect. But that wasn’t quite the look I had in mind. Instead, I wanted continuous, unbroken waves of color stretching vertically up the blanket.
So the first change I made was to take the original pattern, rotate it 90°, and extend it horizontally and vertically. This works beautifully for baby blankets, which are relatively light, though I suspect the original designer used seams to support the weight and stretch of an adult-sized blanket.
Second, I cleaned up the edges by adding a garter stitch border. This not only prevents the stockinette stitch sections from rolling, it also neatly conceals the yarn that is carried up the sides of the blanket. Adding a slipped stitch at the beginning and end of each WS row also boosts the crispness of the border.
Finally, I detailed ALL of the instructions. The original designer had a few rows where they instruct you to “knit/purl the wraps as you cross them”. This can probably be understood by experienced knitters, but I thought beginner knitters might struggle to identify wraps and know how to work them. So, the instructions below describe exactly when, where, and how to work your wraps.
What you’ll need:
- 1 skein lion brand baby soft yarn in white
- 2 skeins Big twist menagerie yarn in hummingbird
- Size 4.0mm straight knitting needles
- Darning needle for weaving in ends
Abbreviations:
- CO: Cast on (we used the classic long-tail cast on).
- k: knit.
- p: purl.
- sl1wyif: slip 1 stitch purlwise with the working strand in front.
- w&t (wrap and turn): move the working strand to the RS, slip 1 stitch purlwise, move yarn to ws, move the slipped stitch back to the lefthand needle, then turn your work.
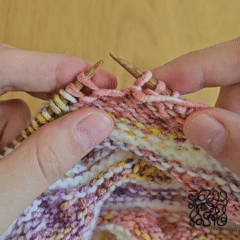
- pw (purl wrap, see GIF): pick up the wrap from the RS and place on the lefthand needle, then purl the wrap together with the wrapped stitch
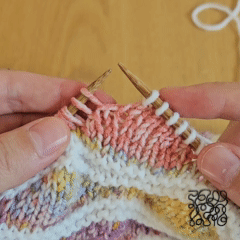
- kw (knit wrap, see GIF): insert needle into front of wrap as if to knit, insert needle into wrapped stitch as if to knit, then knit those two stitches together.
Gauge:
- 21 stitches = 10cm in wave stitch pattern on 4.0mm needles.
- Gauge isn’t extremely important with blankets, but it’s helpful to knit a swatch to get familiar with the pattern. We recommend knitting a swatch of 27 stitches by following the pattern instructions.
Sizes:
- This blanket measures approximately 67cm x 80cm
- The pattern can be sized up or down by adding/subtracting increments of 14 stitches (minimum 27 stitches)
Notes:
- Color A = garter stripes
- Color B = stockinette areas
- Rows 2 and 8 may appear intimidating at first glance. But don’t worry! Just take them one stitch at a time and you’ll soon learn to recognize the repetitions.
What you’ll need:
- 1 skein lion brand baby soft yarn in white
- 2 skeins Big twist menagerie yarn in hummingbird
- US Size 6 straight knitting needles
- Darning needle for weaving in ends
Abbreviations:
- CO: Cast on (we used the classic long-tail cast on)
- k: knit.
- p: purl.
- sl1wyif: slip 1 stitch purlwise with the working strand in front.
- w&t (wrap and turn): move the working strand to the RS, slip 1 stitch purlwise, move yarn to ws, move the slipped stitch back to the lefthand needle, then turn your work.
- pw (purl wrap, see GIF): pick up the wrap from the RS and place on the lefthand needle, then purl the wrap together with the wrapped stitch
- kw (knit wrap, see GIF): insert needle into front of wrap as if to knit, insert needle into wrapped stitch as if to knit, then knit those two stitches together.
Gauge:
- 21 stitches = 4 inches in pattern on US size 6 knitting needles.
- Gauge isn’t extremely important with blankets, but it’s helpful to knit a swatch to get familiar with the pattern. We recommend knitting a swatch of 27 stitches by following the pattern instructions.
Size:
- This blanket measures approximately 26 ½ x 31 ½ inches
- The pattern can be sized up or down by adding/subtracting increments of 14 stitches (minimum 27 stitches)
Notes:
- Color A = garter stripes
- Color B = stockinette areas
- Rows 2 and 8 may appear intimidating at first glance. But don’t worry! Just take them one stitch at a time and you’ll soon learn to recognize the repetitions.
Instructions
With color A, cast on 167 stitches
Border row 1 (RS, color A): knit
Border row 2 (WS, color A): sl1wyif, knit to last stitch, sl1wyif
Border row 3 (color A): knit
Border row 4 (color A): repeat row 2
As you continue into the pattern, remember to carry both yarns up the side of the blanket. Adding a twist between the working and non-working strand at the beginning of the RS rows will create a super clean border.
Row 1 (color B): knit
Row 2 (color B): sl1wyif, k2, p11, *w&t, k8, w&t, p7, w&t, k6, w&t, p5, w&t, k4, w&t, p4, pw three times consecutively, p13, continue repeating from the *, stopping abruptly when three stitches remain. Then k2, sl1wyif, turn, k7, w&t, p4, k2, sl1wyif, turn, k6, w&t, p3, k2, sl1wyif, turn, k5, w&t, p2, k2, sl1wyif
Row 3 (color A): k5, *kw three times consecutively, k11, continue repeating from the * until you run out of stitches
Row 4 (color A): repeat row 2
Row 5 (color A): knit
Row 6 (color A): repeat row 2
Row 7 (color B): knit
Row 8 (color B): sl1wyif, k2, p4, w&t, k7, turn, sl1wyif, k2, p3, w&t, k6, turn, sl1wyif, k2, p2, w&t, k5, turn, sl1wyif, k2, p2, pw three times consecutively, p13, *w&t, k8, w&t, p7, w&t, k6, w&t, p5, w&t, k4, w&t, p4, pw three times consecutively, p13, continue repeating from the *, stopping abruptly when 3 stitches remain k2, sl1wyif
Row 9 (color A): k12, *kw three times consecutively, k11, repeat from * until 1 stitch remains, k1
Row 10 (color A): repeat row 2
Row 11 (color A): knit
Row 12 (color A): repeat row 2
Repeat rows 1-12 twelve times more, or until blanket reaches desired width.
Binding off
Bind off row 1 (color A): knit
Bind off row 2 (color A): Loosely bind off using the basic bind off method (k2, pass first stitch over the second stitch and off the needle. Knit another stitch, pass first stitch over second stitch, etc, etc).
- PurlSoho has this great tutorial if you need additional guidance for the bind off.
- If you’re prone to knitting tight, try going up 1-2 needle sizes for this final row!
Finishing
Block the blanket and weave in any loose ends to finish.
Want FREE knitting patterns?
Subscribers get FREE access to newly-released patterns.