Cambronne Beanie
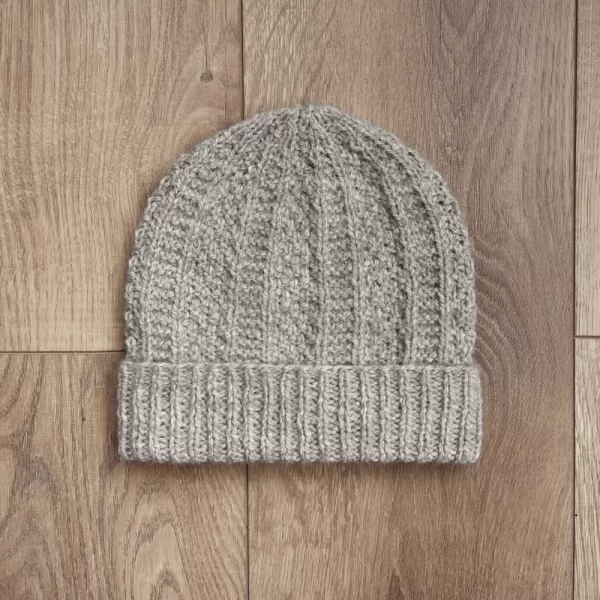
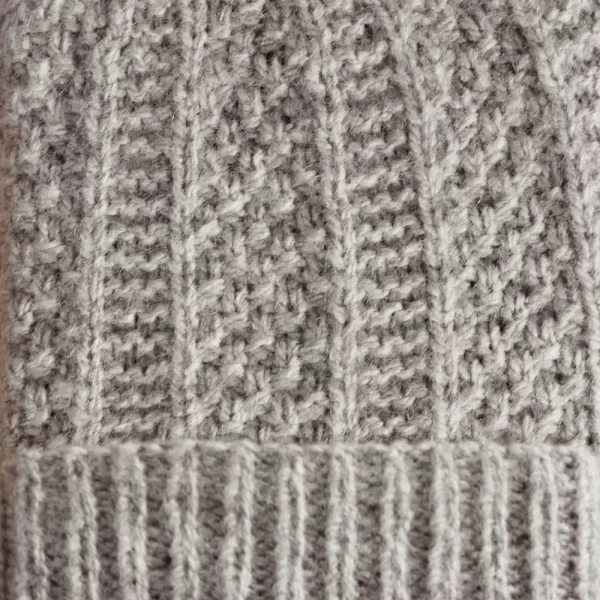
The blend of garter stitch and double seed stitch lends the perfect amount of texture to the Cambronne Beanie.
The Cambronne Beanie was designed with all the texture of a fisherman sweater (minus the complex cables). This pattern knits up fairly quick, making it the perfect project for novice knitters.
Update: 8+ months of regular use and this hat still looks and feels great. It’s amazingly soft, the stitch pattern is well-defined, and the ribbing has lost none of its elasticity. We love it so much, we created the Cambronne Cowl to complete the look.
What you’ll need:
- 1 skein of Yarn Bee Warm & Cozy in color Oat, or another lightweight / fluffy size 4 yarn.
- 3.75mm knitting needles, straight or 40cm circular
- 4.5mm knitting needles, straight or 40cm circular
- If working in the round, a set of 4.5mm DPNs
- Darning needle for seaming / weaving in ends
Abbreviations:
- CO: Cast on. We used the classic long-tail cast on.
- k: knit.
- p: purl.
- sl1: slip one stitch purlwise.
- ssk: slip the next 2 stitches knitwise, then knit those two stitches together from the right-hand needle (1 stitch decreased).
- k2tog: knit two stitches together (1 stitch decreased).
- p2tog: purl two stitches together (1 stitch decreased).
Gauge:
- 18st = 10cm in double seed stitch on larger needles.
Sizes:
- This pattern is available in 2 sizes: Adult Small [Adult Medium/Large].
- Size S fits heads approximately 46-50cm around.
- Size M/L (recommend for most adults) fits heads approximately 50-58cm around.
Notes:
- This hat can be knit flat or in the round.
- This pattern can be easily sized up/down by adding/reducing stitches in increments of 10.
What you’ll need:
- 1 skein of Yarn Bee Warm & Cozy in color Oat, or another lightweight / fluffy size 4 yarn.
- US size 5 knitting needles, straight or 16-inch circular
- US size 7 knitting needles, straight or 16-inch circular
- If working in the round, a set of US Size 7 DPNs
- Darning needle for seaming / weaving in ends
Abbreviations:
- CO: Cast on. We used the classic long-tail cast on.
- k: knit.
- p: purl.
- sl1: slip one stitch purlwise.
- ssk: slip the next 2 stitches knitwise, then knit those two stitches together from the right-hand needle (1 stitch decreased).
- k2tog: knit two stitches together (1 stitch decreased).
- p2tog: purl two stitches together (1 stitch decreased).
Gauge:
- 18st = 4 inches in double seed stitch on larger needles.
Size:
- This pattern is available in 2 sizes: Adult Small [Adult Medium/Large].
- Size S fits heads approximately 18-20 inches around.
- Size M/L (recommend for most adults) fits heads approximately 20-23 inches around.
Notes:
- This hat can be knit flat or in the round.
- This pattern can be easily sized up/down by adding/reducing stitches in increments of 10.
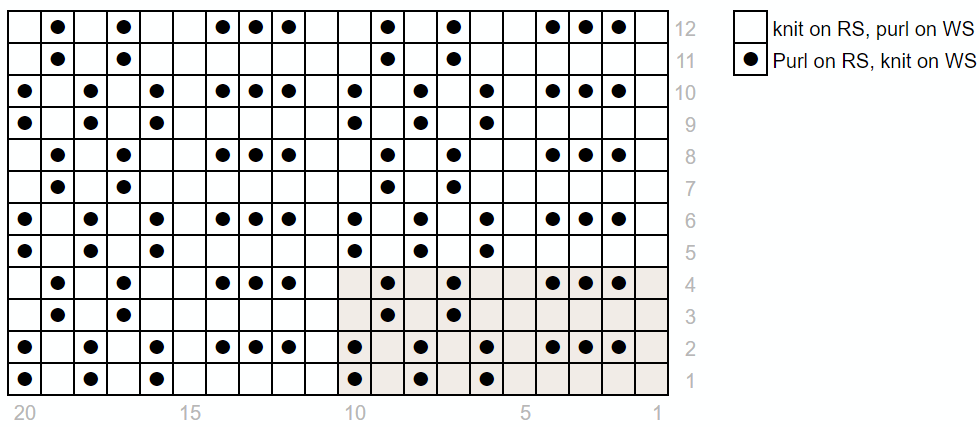
Chart:
This chart shows the stitch pattern from the body of the hat. It does not account for whether the pattern is knit flat or in the round. For exact instructions, follow the patterns below.

Instructions for Knitting Flat
Brim
With smaller needles, CO 82 [92] stitches (not too tight).
Row 1: *p1, k1, repeat from * to end of row
Row 2: repeat row 1
Repeat these two rows until hat measures 7 [8.5] centimeters or 2¾ [3¼] inches from cast-on edge.
Body of Hat
Switch to larger gauge needles.
Row 1 (right side): sl1, k1, *k4, (p1, k1)x3, repeat from * to end of row
Row 2 (wrong side): sl1, *(k1, p1)x3, k3, p1, repeat from * to last stitch, p1
Row 3: sl1, *k6, p1, k1, p1, k1, repeat from * to last stitch, k1
Row 4: sl1, p1, *k1, p1, k1, p2, k3, p2, repeat from * to end of row
Repeat rows 1-4 until the body (not including the ribbed brim) measures 11 [12.5] centimeters or 4¼ [5] inches.
*** Important note: only move to the crown section after completing a repetition of row 4. The following decreases are strategically placed to be invisible, and it won’t look right if you transition after completing a repetition of row 2.
Crown
Row 1 (rs): sl1, *k5, p1, k1, p1, ssk, repeat from * to last stitch, k1 (74 [83] stitches)
Row 2 (ws): sl1, p1, *k1, p1, k1, p1, k3, p2, repeat from * to end of row
Row 3: sl1, *k2, k2tog, k2, p1, k1, p1, repeat from * to last stitch, k1 (66 [74] stitches)
Row 4: sl1, *k1, p1, k1, p2, k2, p1, repeat from * to last stitch, p1
Row 5: sl1, *k4, k2tog, p1, k1, repeat from * to last stitch, k1 (58 [65] stitches)
Row 6: sl1, p1, *k1, p2, k2, p2, repeat from * to end of row
Row 7: sl1, *k1, k2tog, k1, p1, k1, p1, repeat from * to last stitch, k1 (50 [56] stitches)
Row 8: sl1, *k1, p1, repeat from * to last stitch, p1
Row 9: sl1, *k3, p2tog, k1, repeat from * to last stitch, k1 (42 [47] stitches)
Row 10: sl1, p1, *k1, p1, k1, p2, repeat from * to end of row
Row 11: sl1, k1, *k2tog, k1, p1, k1, repeat from * to end of row (34 [38] stitches)
Row 12: sl1, *k1, p3, repeat from * to last stitch, p1
Row 13: sl1, *k2, p2tog, repeat from * to last stitch, k1 (26 [29] stitches)
Row 14: sl1, *k1, p2, repeat from * to last stitch, p1
Row 15: sl1, *ssk, k1, repeat from * to last stitch, k1 (18 [20] stitches)
Row 16: sl1, purl to end of row
Row 17: sl1, k2tog to last stitch, k1 (10 [11] stitches).
Row 18 (size S only): sl1, p2tog four times, p1 (6 stitches)o
Row 18 (size M/L only): sl1, p2tog five times
Cut a long tail and thread through remaining stitches to bind off. Pull tight to close.
Finishing
Block the hat, seam up the side, and weave in any loose ends to finish.
Instructions for Knitting in the Round:
Brim
With smaller circular needles or DPNs, CO 80 [90] stitches. Place a marker and join, taking care not to twist your work.
Round 1: *k1, p1, repeat from * to end of round
Round 2: repeat round 1
Repeat these two rounds until hat measures 7 [8.5] centimeters or 2¾ [3¼] inches from cast-on edge.
Body of Hat
Switch to the larger needles.
Round 1: *k5, p1, k1, p1, k1, p1 repeat from * to end of round
Round 2: *k1, p3, (k1, p1)x3, repeat from * to end of round
Round 3: *k6, p1, k1, p1, k1, repeat from * to end of round
Round 4: *k1, p3, k2, p1, k1, p1, k1, repeat from * to end of round
Repeat rounds 1-4 until the body (not including the ribbed brim) measures 11 [12.5] centimeters or 4¼ [5] inches.
*** Important note: only move to the crown section after completing a repetition of round 4. The following decreases are strategically placed to be invisible, and it won’t look right if you transition after completing a repetition of round 2.
Crown
*** if working on circular needles, you’ll need to switch to DPNs when the stitches get too tight***
Round 1: *k5, p1, k1, p1, ssk, repeat from * to end of round (72 [81] stitches)
Round 2: *k1, p3, k1, p1, k1, p1, k1, repeat from * to end of round
Round 3: *k2, k2tog, k2, p1, k1, p1, repeat from * to end of round (64 [72] stitches)
Round 4: *k1, p2, k2, p1, k1, p1, repeat from * to end of round
Round 5: *k4, k2tog, p1, k1, repeat from * to end of round (56 [63] stitches)
Round 6: *k1, p2, k2, p1, k1, repeat from * to end of round
Round 7: *k1, k2tog, k1, p1, k1, p1, repeat from * to end of round (48 [54] stitches)
Round 8: *k1, p1, repeat from * to end of round
Round 9: *k3, p2tog, k1, repeat from * to end of round (40 [45] stitches)
Round 10: *k1, p1, k1, p1, k1, repeat from * to end of round
Round 11: *k1, k2tog, k1, p1, repeat from * to end of round (32 [36] stitches)
Round 12: *k3, p1, repeat from * to end of round
Round 13: *k2, p2tog, repeat from * to end of round (24 [27] stitches)
Round 14: *k2, p1, repeat from * to end of round
Round 15: *ssk, k1, repeat from * to end of round (16 [18] stitches)
Round 16: knit
Round 17: k2tog to end of row (8 [9] stitches)
Round 18 (size S only): k2tog four times
Round 18 (size M/L only): k2togx4, k1
Cut a long tail and thread through remaining stitches to bind off. Pull tight to close.
Finishing
Block the hat and weave in all loose ends to finish.
Want FREE knitting patterns?
Subscribers get FREE access to newly-released patterns.


Thank you!
Just a question, if kitting flat can you not follow the chart ?
The chart does not correspond with the written instructions? I am knitting flat thanks
Hi Wendy, you’ll notice the chart key states which stitch to perform on the RS and the WS.
In short:
On the Right Side, follow the chart
On the Wrong Side, do the inverse stitches
Hi Leneta. I just made the hat and wanted to thank you for providing such a nice well written pattern for free. The hat was fun to knit and the fit is great.
Hi Patty,
Thanks for the feedback, I’m so happy to hear it!
Personally, I love sharing my knitting patterns for free. I relied exclusively on free patterns when I was a broke highschool/college student, and this is my way of paying it forward.
Hi I have just purchased the hat pattern will it be sent to me or can I download it please
Hi Rose,
This is a free pattern, the knitting instructions are available on the page above. It’s not available for purchase.
Maybe you clicked on one of the advertisements on the page? I recommend reaching out to your bank or credit card company to reverse the purchase.
Gracias por el patrón, voy a realizar lo.